Need someplace to host your projects and find Amazon EC2 or the Rackspace cloud too expensive or under-powered? I have a solution for you that provides more flexibility and more power for about $100/month.
My tools of choice for this endeavor are a dedicated server from OVH, I chose to go with their SP2 tier (32GB RAM, 2TB HD, 4 core Intel Xeon E3 1245v2)

The most important feature to look for in the server you rent is “Virtualization Support” since you’re going to be running a bunch of virtual machines on the server. The cost for the server I selected is $90/month, and an additional cost of $20/month for extended services if you want more then 1 IP address, which is useful, but not strictly necessary (covered below).
Infrastructure
Because I’m familiar with it and it will remain supported until 2017, I use Ubuntu Server 12.04 LTS as the base operating system and the following instructions are geared towards it.
We’ll be using KVM and libvirt to run our Virtual Machines, so run the following to get it installed
$ sudo apt-get install kvm libvirt-bin libvirt-doc sasl2-binIn order to access libvirtd over tcp, you need to make a few config file modifications:
Add a “-l” (a lowercase L)
/etc/default/libvirt-bin

libvirtd_opts="-d -l"
Enable TCP and disable TLS
/etc/libvirt/libvirtd.conf

# uncomment the following two lines
listen_tls = 0
listen_tcp = 1
Restart libvirtd to apply the changes
$ sudo service libvirt-bin restartNow we need to add a user for accessing libvirtd, that can be accomplished with:
$ sudo saslpasswd2 -a libvirt johnNetworking
In order to connect to the VMs we’ll be creating, there’s some network configuration that needs to be done. The first step is to install these packages:
$ sudo apt-get install bridge-utilsIf you’re using a restrictive iptables setup, you need to allow connections from the NAT bridge interface that KVM uses and the loopback adapter, you can do that with the following iptables rules:
$ sudo iptables -A INPUT -i virbr0 -j ACCEPT
$ sudo iptables -A INPUT -i lo -j ACCEPT
To persist these rules I use the setup from the Securing Ubuntu article linked above. You can find a copy of my iptables rules in this Gist.
At this point you have a choice to make. Do you want external IP addresses for some of your VMs? If you do, you’ll need to follow the instructions in the following section to setup network bridging. The alternative is to use iptables to forward specific ports from the server to individual VMs, or use a reverse proxy like nginx or apache to direct web traffic to VMs based on hostname.
Network Bridging
If you plan on assigning external IP addresses to your VMs you need to setup a network bridge for your ethernet adapter:
Add network bridge
/etc/network/interfaces

auto eth0
iface eth0 inet manual

auto br0
iface br0 inet static
    address 12.34.56.78
    netmask 255.255.255.0
    network 12.34.56.0
    broadcast 12.34.56.255
    gateway 12.34.56.254
    bridge_ports eth0
    bridge_stp off
    bridge_fd 0
    bridge_maxwait 0
In order for the VMs to communicate freely with the outside world, the following configuration disables iptables from interfering with bridged traffic.
Add the following lines to the end of the file
/etc/sysctl.conf

   net.bridge.bridge-nf-call-ip6tables = 0
   net.bridge.bridge-nf-call-iptables = 0
  net.bridge.bridge-nf-call-arptables = 0
Reload the kernel with the new sysctl parameters
$ sudo sysctl -p /etc/sysctl.conf
$ sudo service networking restart
At this point, it’s also a good idea to reboot the server to ensure all the networking changes get applied. Once that’s complete you can check for the bridged adapter by running:
$ brctl show
bridge name     bridge id               STP enabled     interfaces
virbr0          8000.000000000000       yes
br0             8000.000e0cb30550       no              eth0
Creating and Managing VMs
Once you have the infrastructure and network setup, you can access to the server from an administration tool for libvirt. I use virt-manager, which you can install on your Ubuntu Desktop with:
$ sudo apt-get install virt-managerAnother promising tool to consider is Web Virtual Manager, which, when set up on the host machine provides a web interface for creating and managing virtual machines. I found it to be quite buggy, but useful for starting and stopping existing VMs when I don’t have access to my desktop and virt-manager.
To add a connection to your server with the following settings (using your server IP/hostname and your unix username)
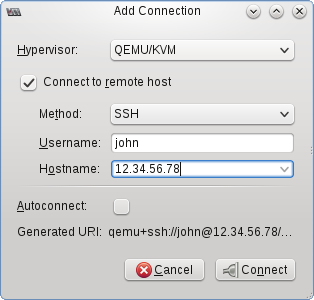
If you've set up public key authentication from your desktop to your server, this is all that’s required to connect.
The first step, once you’re connected is to setup the storage pool for your VMs. You can do that by right clicking on the connection and selecting “Details” For simplicity, I just use a directory storage pool, which stores disk image files in the directory you specify.
$ sudo mkdir /home/vm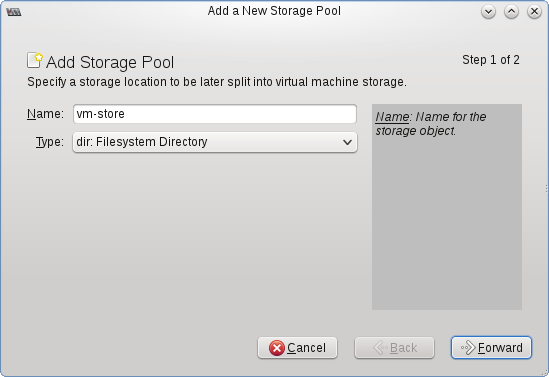
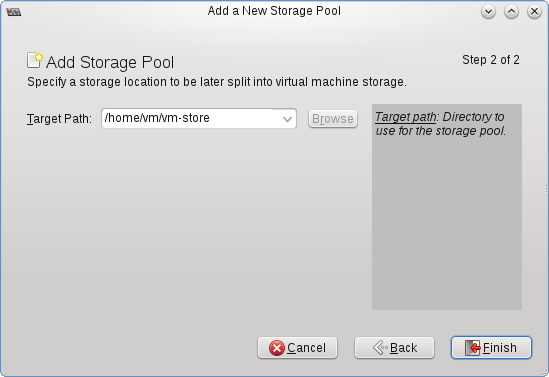
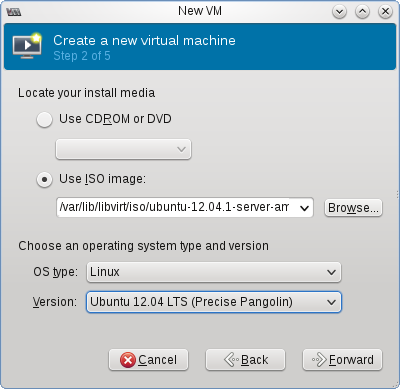
Once you have your storage space set up, you’re almost ready to create a virtual machine. The only thing between you and your new VM is getting the install cd ISO for your OS of choice. I choose to store them in a second storage pool called ‘iso’
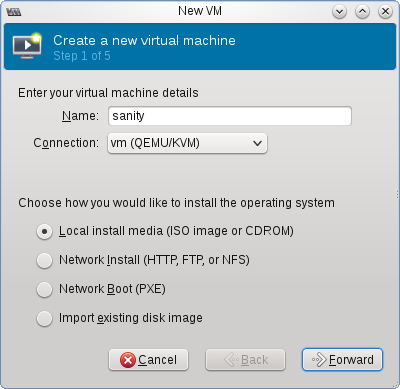
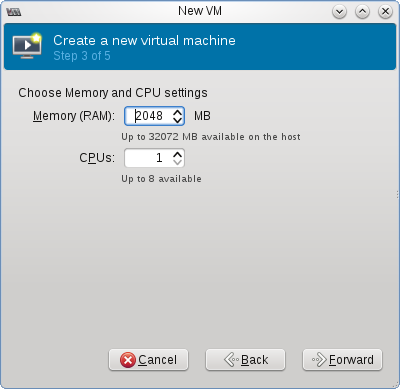
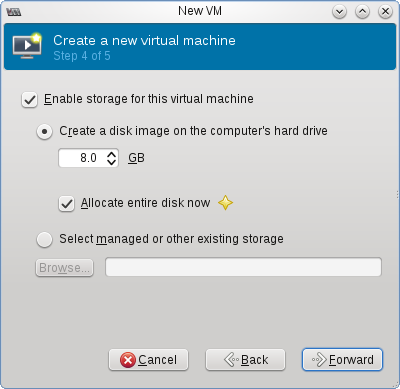
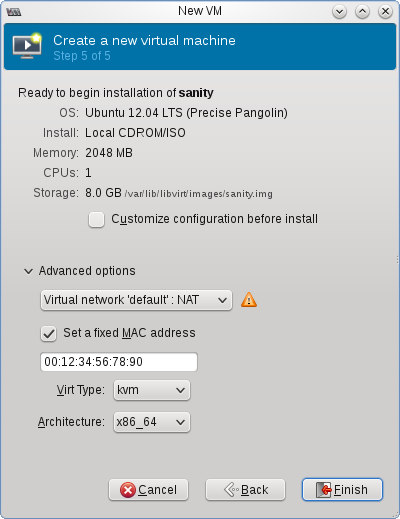
From the Virtual Machine Manager, click “New VM” and follow the wizard choosing how much memory, CPU and hard drive space to allocate the new VM:
The last step varies based on if you want an external IP for your VM. If you do, you may have to use a MAC address provided by your hosting provider. With OVH, you generate one from their control panel’s “IPs and Reverses” section, check with your host for their specific requirements. You’ll also need to specify the network bridge created before.
If you don’t need a specific MAC, you can use the one generated by virt-manager or set your own, I find this command from the Ubuntu Wiki page on KVM Networking helpful for generating a random QEMU vendor prefixed addresses:
$ MACADDR="52:54:00:$(dd if=/dev/urandom bs=512 count=1 2>/dev/null | md5sum | sed 's/^\(..\)\(..\)\(..\).*$/\1:\2:\3/')"; echo $MACADDR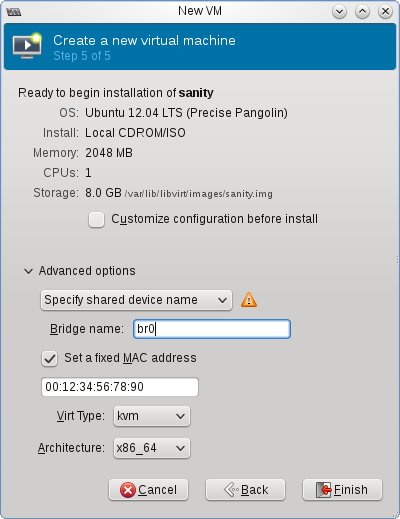
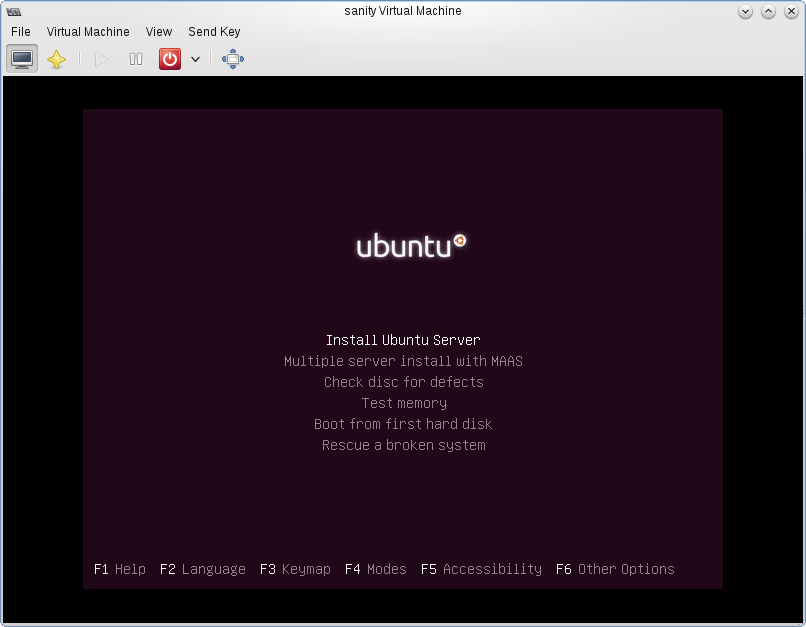
When you finish, the VM will start and virt-manager will give you a graphical console via VNC connection to set up your VM.
Congratulations! You now have the basis for your own private cloud. What you do with it is entirely up to you now.
Want a next step? I suggest trying to setup something like CloudFoundry on at least one VM, just to give yourself another taste of what the cloud feels like.